activemq与rabbitmq的区别
上一篇博文讲解了rabbitmq消息中间件的一些使用方法,在使用activemq之前我们先了解一下他们二则的区别
activemq:
优点 -> 遵循JMS规范,安装部署方便
缺点 -> 会莫名丢失消息,目前重心在下一代产品apolle上,目前社区不活跃,对5.x维护较少
适合中小型项目消息应用,不适合上千队列应用场景
rabbitmq:
优点 -> 继承erlang天生并发性最初用于金融行业,稳定性,安全性有保障
缺点 -> erlang语言难度较大不支持动态扩展
适合对稳定性要求高的应用
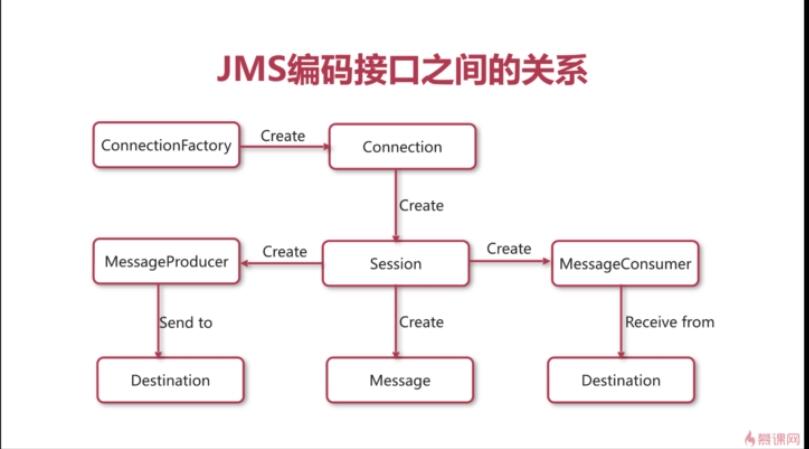
JMS
jms是什么呢是java消息中间件的接口规范
各接口之间的关系如下图所示
配置activemq
- 下载activemq window 版本apache-activemq-5.15.4-bin.zip,linux版本 apache-activemq-5.15.4-bin.tar.gz
- 在bin目录中启动程序
- 特别说明在windows中可以选择以服务的方式启动activemq 既启动运行InstallService.bat后再服务中启动对应服务
- 启动后通过http://ip:8161即可访问activemq管理,默认中号密码为admin
使用jms操作消息队列
加入依赖
1
2
3
4
5
| <dependency>
<groupId>org.apache.activemq</groupId>
<artifactId>activemq-all</artifactId>
<version>5.9.0</version>
</dependency>
|
发送消息
1
2
3
4
5
6
7
8
9
10
11
12
13
14
15
16
17
18
19
20
21
22
23
24
25
26
| // activemq默认端口为61616
String url = "tcp://127.0.0.1:61616";
// 创建工厂
ConnectionFactory connectionFactory = new ActiveMQConnectionFactory(url);
try {
// 获得连接
Connection connection = connectionFactory.createConnection();
// 启动连接
connection.start();
// 获得session
Session session = connection.createSession(false, Session.AUTO_ACKNOWLEDGE);
// 设置路径, “wugui”为消息队列名称
Destination wugui = session.createQueue("wugui");
// 创建消息生产者
MessageProducer producer = session.createProducer(wugui);
// 发送文本消息
TextMessage textMessage = null;
for (int q = 0; q < 500; q++) {
textMessage = session.createTextMessage("wugui" + q);
producer.send(textMessage);
}
// 关闭连接
connection.close();
} catch (JMSException e) {
e.printStackTrace();
}
|
接收消息
1
2
3
4
5
6
7
8
9
10
11
12
13
14
15
16
17
18
19
| String url = "tcp://127.0.0.1:61616";
ConnectionFactory connectionFactory = new ActiveMQConnectionFactory(url);
try {
Connection connection = connectionFactory.createConnection();
connection.start();
Session session = connection.createSession(false, Session.AUTO_ACKNOWLEDGE);
Destination destination = session.createQueue("wugui");
MessageConsumer consumer = session.createConsumer(destination);
consumer.setMessageListener((a) ->{
TextMessage textMessage = (TextMessage) a;
try {
System.out.println(textMessage.getText());
} catch (JMSException e) {
e.printStackTrace();
}
});
} catch (JMSException e) {
e.printStackTrace();
}
|
以上为非订阅模式如果需要订阅模式 在session.createQueue处修改为session.createTopic即可
在这里要注意这两个模式的区别
Master/Slave共享存储集群搭建
一般activemq的Master Slave是基于KAHADB的阻塞来做的
activemq服务器结构
在这里是使用三个节点进行配置 这三个节点
activemq.xml
1
2
3
4
5
| <networkConnectors>
<networkConnector name = "*" uri="static:(tcp://ip:port,tcp://ip:port)" />
</networkConnectors>
|
jetty.xml